
At Pneuparts, we understand that your machines are always in motion. Processes must run smoothly, which is why our dedicated and specialized staff are here to help every day. Personal contact and expertise are central to our cooperation, because our mission is to support you in extending the lifespan and maximizing the performance of your machines. Correctly installing hose clamps is essential for a safe and leak-free connection. In this article, we’ll show you how to do it properly and easily.
Before securing the hose, selecting the right hose clamp is essential. There are different types of hose clamps for various applications and sizes. The diameter of the hose in mm is the starting point for your selection. The band width is also important. Many hose clamps come in various materials. Stainless steel is corrosion-resistant and ideal for demanding environments.
Understanding the types of hose clamps helps you make the right choice for any situation.
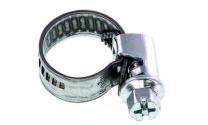
These are the most commonly used hose clamps. They consist of a band with a screw mechanism. You tighten the screw using a screwdriver, securing the hose. They are easy to reposition and reusable.
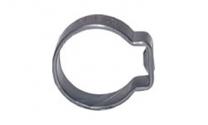
This type has an "ear" that you squeeze with a special tool. It creates a strong, permanent connection that withstands vibration useful for vehicle applications.
Spring Clamps:
Made of spring steel, these clamps adjust to temperature changes, making them a great choice for cooling systems.
Installing hose clamps is easy when done the right way. Follow these steps to avoid leaks and damage.
Step 1: Prepare the Hose and Fittings
Ensure hoses and fittings are clean and free from dirt or grease. This improves grip. Choose clamps with the correct diameter and appropriate band width for your application.
Step 2: Position the Clamp Correctly
Slide the clamp over the hose before attaching it to the fitting. Place the clamp approximately 5mm from the edge of the pipe or fitting. This ensures optimal pressure distribution and prevents the hose from tearing, extending its lifespan.
Step 3: Tighten the Clamp
Use a screwdriver or socket wrench to tighten the clamp. It should be firm but not overtightened, as that may damage the hose. Tighten until you feel resistance the clamp should not move.
Step 4: Check the Connection
After tightening, check the connection by gently twisting the hose. If it doesn’t move or shift, it's secure. You can also pressurize the system and check for leaks.
Even with good tools, mistakes happen. A common one is using a clamp that’s too large for the hose, making it impossible to tighten effectively. Over-tightening can also cause damage. Always ensure the clamp is positioned correctly over the fitting and hose. This ensures proper installation and prevents leaks.
Proper hose clamp installation is essential for an efficient and safe compressed air system. By choosing the right clamp, considering the hose diameter, and following our steps, you’ll avoid unnecessary downtime. It’s a simple task that contributes to machine durability and process reliability.
Need Help?
At Pneuparts, we’re here to help whether you're repairing lines or installing new ones. Got specific questions? Don’t hesitate to contact one of our specialists.
 |  |  |  |  |
NEED HELP ?
For individual technical advice or support, please contact one of our specialists.
We are available from Monday to Friday from 8 am to 5 pm (CET)
 | +31(0)493-763993 |
+31(0)493-763993
ORDERING SERVICE
Order pickup
You can collect your order on working days between 08:00 - 12:00 & 13:00 - 17:00, Florijn 10 b/c Deurne.
Same day delivery
Urgent orders can be delivered by a courier. Express shipments and courier services may be extra charged.
Orders are shipped the same day, if in stock, and delivered to you the next day by UPS.


